Power your Cypress tests with CircleCI
This blog, will make you understand how to implement your e2e tests using Cypress and do continuous integration and delivery with CircleCI for your tests.

About Cypress
Cypress is a next generation front end testing tool, built for modern web app’s. Cypress comes fully baked with features like:
- Time travel
- Debuggability
- Automatic waiting
- Screenshots and Videos
- Cross browser Testing
- And lots more…
Cypress is architecturally different. Unlike most tools, it operates within the same run loop of your application. It synchronizes with a Node process and manages the communication, synchronization and performs task on behalf of each other.
Project Setup
Let’s start setting up a basic Cypress project
- Create a folder with name
cypress-circleciand initialize your node project
$ mkdir cypress-circleci
$ npm init- Install cypress with command
npm install cypress --save- Open the cypress from your project
npx cypress open- Folder structure would look something like these
circleci-cypress
│
└───fixtures
│   │   sampleData.json
│   │
└───integration
│   │  siteVerify.js
│
└───plugins
│   │  index.js
│
└───screenshots
│   │  img1.pmg
│
└───results
│   │  test
│
└───supports
│   │  commands.js
│   │  index.js
|
└───cypress.json
└───package.json- Create a basic test to verify the site ”https://dikshitashirodkar.com”. And you can configure the base url of your site inside
cypress.json
{
  "baseUrl": "https://dikshitashirodkar.com/",
  "video": false,
  "reporterOptions": {
    "mochaFile": "cypress/results/tests-[hash].xml",
    "toConsole": true
  }
}Note: By default, cypress provides a video recording of the executed tests, here we have explictily turned it off using the video flag. And added configurations for an xml report.
The below test file uses fixtures (used to store and manage test data, which is nothing but a json file).
A simple fixture file with name sample.json
{
  "imageName": "dikshita",
  "heading": "QA Talking point"
}
Here’s basic test integration/test.js, The test contains:
- Visit the site
- Verify the response status of the site to be 200
- Verify the heading of the blog to be “QA Talking point”
- Verify the image icon of the blog to be “dikshita”
describe("Verify the website", function() {
  before(function() {
    cy.visit("/")
  })

  beforeEach(function() {
    cy.fixture("sample").then(function(sample) {
      this.sample = sample
    })
  })

  it("verify the status of the site", function() {
    cy.request("/about").should(function(response) {
      expect(response.status).to.eq(200)
    })
  })

  it("verify the heading of the blog", function() {
    cy.get(".head-logo")
      .children("a")
      .should("have.text", this.sample.heading)
  })

  it("verfiy the image icon on the site", function() {
    console.log(this.sample, "printing data")
    cy.get(".profile-img")
      .should("have.attr", "src")
      .and("include", this.sample.imageName)
  })
})
Let’s execute the tests using command:
npm run cypress run --browser chromeThe output of the result would something like:
       Spec                                              Tests  Passing  Failing  Pending  Skipped
  ┌────────────────────────────────────────────────────────────────────────────────────────────────┐
  │ ✔  tests/verifySite.js                      00:08        3        3        -        -        - │
  └────────────────────────────────────────────────────────────────────────────────────────────────┘
    ✔  All specs passed!                        00:08        3        3        -        -        -
There you go, you have successfully configured and executed…🏅
Run cypress with CircleCI
CircleCI is a continuous integration and deployment tool, which helps teams to integrate their code within the repository and build the tests, “n” no of times in a day. CircleCI uses Orbs which are open-source, shareable packages of parameterizable resuable configuration elements, with includes jobs, commands and executors.
CircleCI also provides Orb for cypress to test without spending time configuring CircleCI. It also records results & provides a GUI.
Let’s jump to configure CircleCI
- Create a folder
.circleciin the root directory of your project - Add a file within the
.circlecifolder asconfig.yml
version: 2.1
orbs:
  cypress: cypress-io/cypress@1
executors:
  with-chrome:
    resource_class: small
    docker:
      - image: "cypress/browsers:node14.16.0-chrome90-ff88"
workflows:
  build:
    jobs:
      - cypress/install
      - cypress/run:
          requires:
            - cypress/install
          executor: with-chrome
          browser: chrome
          post-steps:
            - run: ls
            - store_test_results:
                path: cypress/results
            - store_artifacts:
path: cypress/screenshotsNote: Place your cypress project into a version controlled system (github or bitbucket). In our case we would place it on github.
Setup your CircleCI account
- You can login to CircleCI portal via gitHub and you’ll have access to all your github repositories within the Project listing screen.

- Inorder to setup circleci for your github project, select
Setup project. This will then ask you to choose the branch from which you want to execute your tets and it should contain theconfig.ymlinside.circlecifolder.
Or another option would be to create a new config file.
Note:For this blog post, we are triggering the pipeline manually. But you can definitely, automate the pipeline trigger process.
- As you setup the project, the pipeline would be triggered automatically and the build progress can be seen

- Success of the pipeline would look like:

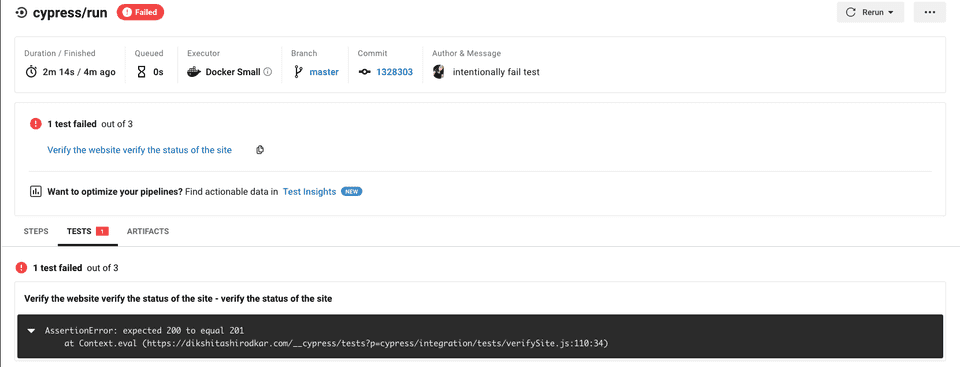
- The failed pipeline would look like this

- We have added the configuration to store both test results & the artifacts in our
config.ymlfile. Hence we would also be able to see the details of the test failing, within the test section and screenshot link of the test in the artifact section


I have also created a github project for your reference.
That’s all for this blog. Hope you have enjoyed it. Thanks for reading…!